Our blog
The latest writings from our team
The latest industry news, interviews, technologies, and resources.
Business
Introduction
Laravel is one of the most popular PHP web application frameworks. It offers a robust and flexible routing system that allows developers to define and manage application URLs effortlessly. In this blog, we'll dive deep into Laravel routes, exploring the fundamental concepts, types of routes, and best practices for working with them.
What Are Routes in Laravel?
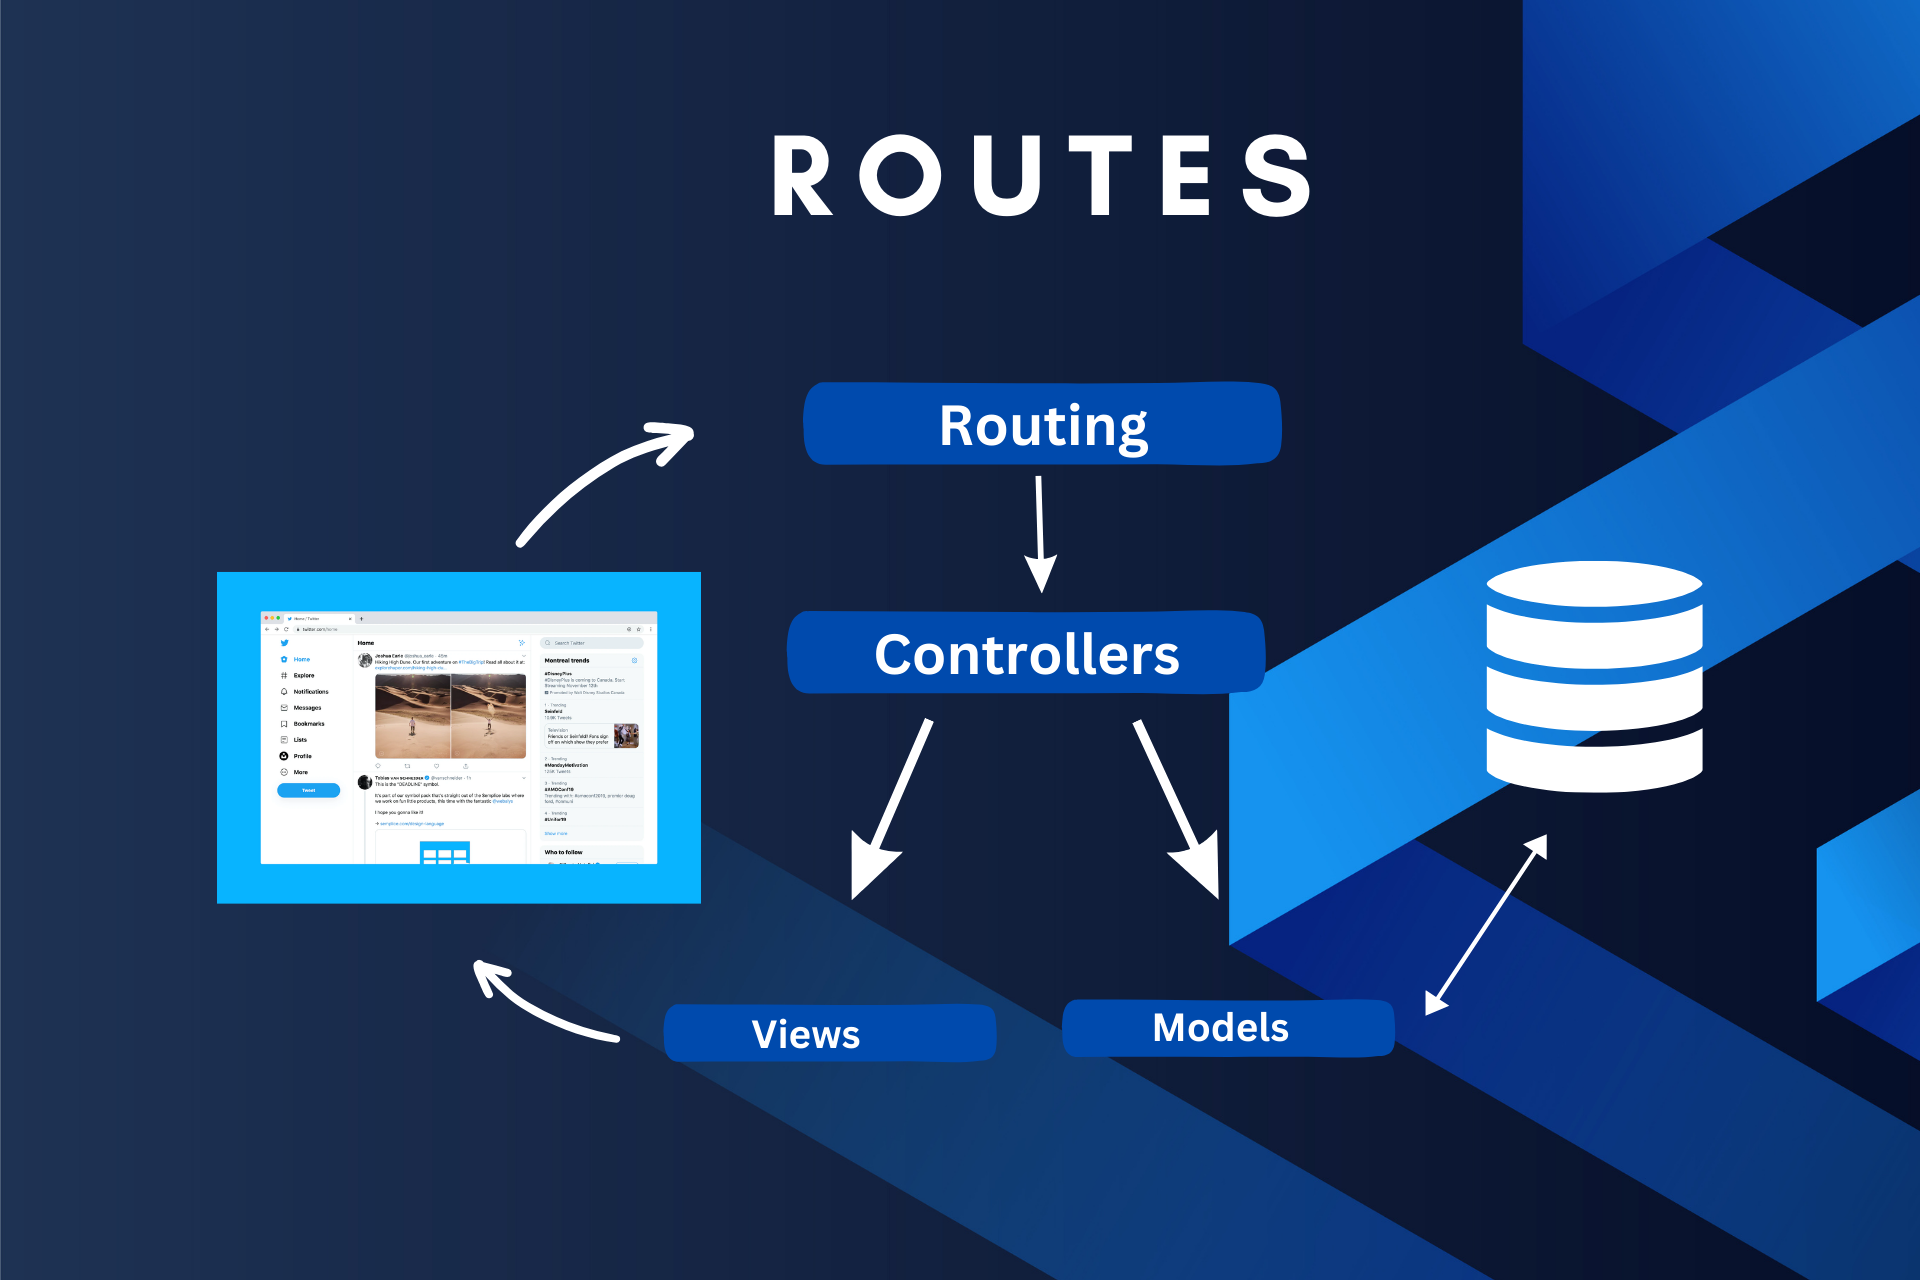
Routes are a fundamental part of web development. They define the entry points to your application, mapping URLs to specific controllers and actions. Simply put, routes determine how your application responds to HTTP requests.
Defining Routes
To define routes in Laravel, you primarily work with the web.php and api.php files, located in the project's route folder. These files contain route definitions using Laravel's expressive routing methods.
Basic Route Definition
Here's a basic example of defining a route in Laravel:
In this example, we're defining a route that responds to the GET request at the /welcome URL with a simple text response.
Route Parameters
Laravel allows you to capture and work with route parameters easily. For example:
In this case, the {id} placeholder captures the value from the URL, making it accessible as a parameter in the route's closure.
Router Methods
The router allows you to register routes that respond to any HTTP verb:
- GET Routes: Used for retrieving resources. For example, displaying a web page or fetching data from the server.
- POST Routes: Typically used for submitting data to the server, such as form submissions.
- PUT/PATCH Routes: Used to update existing resources. PUT is often used for full resource replacement, while PATCH is used for partial updates.
- DELETE Routes: Used to delete resources.
- You may even register a route that responds to all HTTP verbs using the any method.
- If you are defining a route that redirects to another URI, you may use the Route::redirect method.
- If your route only needs to return a view, you may use the Route::view method.
- Route::resource is a convenient method provided by Laravel for defining RESTful resource routes. It allows you to generate a set of standard CRUD (Create, Read, Update, Delete) routes for a resource controller with just a single line of code. This is especially useful for building applications that adhere to RESTful conventions.
- Sometimes, your application will have resources that may only have a single instance. For example, a user's profile can be edited or updated, but a user may not have more than one profile. Likewise, an image may have a single thumbnail. These resources are called singleton resources, meaning one and only one instance of the resource may exist. In these scenarios, you may register a singleton resource controller.
When defining multiple routes that share the same URI, routes using the get, post, put, patch, delete, and options methods should be defined before routes using the any, match, and redirect methods. This ensures the incoming request is matched with the correct route.
Named Routes
Named routes provide a convenient way to reference routes by name rather than their URLs. This is particularly useful when generating links or redirects. To define a named route, use the name method:
You can then generate URLs for named routes using the route function:
Route Middleware and Groups
Middleware is a powerful feature in Laravel that allows you to filter HTTP requests entering your application. You can attach middleware to routes, making it easy to perform tasks like authentication, authorization, logging, and more.
Route groups allow you to apply middleware, prefixes, and namespaces to a group of routes, making it easier to organize and manage routes for specific parts of your application.
Middleware are executed in the order they are listed in the array.
Cruddy by Design
Cruddy by Design is a software development philosophy or approach that emphasizes simplicity and efficiency in creating CRUD (Create, Read, Update, Delete) operations for database-backed applications. These operations are fundamental to many software applications, especially those that involve data management.
Resource Controllers
Instead of defining all of your request-handling logic as closures in your route files, you may wish to organize this behavior using "controller" classes. Controllers can group related request-handling logic into a single class.
4 RULES
These were mentioned by Adam Wathan in his Laracon conference. We follow the rules mentioned by him in our code. Let us checkout the rules:
Dedicate a controller for a nested resource.
Let's say you have a podcasts application and each podcast contains episodes. If you want to create a route to retrieve the episodes of an individual podcast, it might look like this. It will be a nested resource. So, which controller will be used to perform the necessary action? Let's take a look.
Use PodcastsController?
We can see that /podcasts are at the top level. So, to perform nested index actions, the first thought might be to use the PodcastsController. But, if we use PodcastsController for that, we end up defining custom actions that aren't part of the CRUD actions mentioned above. We always want to have the CRUD actions and not custom actions. So, this isn't a good approach. Let's think of other approaches.
Use EpisodesController?
We already have an EpisodesController responsible for handling various actions related to episodes, such as listing episodes, displaying episode details, editing episodes, and updating episodes.
Since the above action should give the list of episodes for the given podcast, you might be tempted to point the route to EpisodesController@index.
But here's where the problem comes in, the EpisodesController@index lists all episodes across all podcasts. So to fix that, you need to pass $id as a parameter to the function in the controller and check if it is null and proceed to perform
- listing of all episodes across all the podcasts if it is null
- Otherwise, list the episodes of a single podcast.
Here we are reusing the same EpisodesController@index twice and the use cases are different. They don't have anything in common as they load different models, and return different views,
That usually looks like this in a routes file:
Let's take a look at the controller:
This doesn't simplify the code, instead, it complicates it even more by using the same controller for two different actions. So, this method isn't good as well.
The answer is - Create a PodcastEpisodesController
If we iterate over the list of standard actions, the index is the most suitable action for our case. We need the index of individual podcast episodes. So, let's create a new PodcastEpisodesController.
Here's the PodcastEpisodesController:
If you have any other routes related to episodes nested under podcasts resource, their actions can also be handled by PodacastEpisodesController.
Treat properties edited independently as separate resources
Each podcast might have a cover image, title, created date etc. as its properties. Let's take a look at the cover image of a podcast.
Here's the endpoint:
If you look at the endpoint, it is pretty clear that the action isn't standard CRUD action. If you iterate over the CRUD actions, the update is the fitting one. For updating an image, all we are doing is updating a field on the podcasts table.
You might think that what we are doing here is an "update" action against our podcasts resource, but it already has an update action which is updating the title,description and website and it doesn't include the cover image. They hit different end points as well. So what should we do?
Create a PodcastCoverImageController
Here we are using two forms to update the podcast properties:
- form1 - to update the details of the podcast
- form2 - to update the cover image of the podcast
In cases like these, it is better to use separate controllers for each.
So instead of making a POST request to update-cover-image, let's make a PUT request that treats the cover image like its own resource:
Treat pivot models as their own resource
Since it is a podcast application, you can subscribe to the podcasts you like and unsubscribe if you lose interest in them. Let's look at how it's being handled.
So, we need to look at PodcastsController@subscribe and PodcastsController@unsubscribe. Here are the endpoints:
Where does subscribing fit in the CRUD operations we have? It would fit in the store, since we would be storing the podcast if subscribed else we will be deleting that. Let's create a new controller called Subscription Controller. Then the endpoint would be:
If we were using the podcast controller, we were using the id as the route parameter which is not available here. So, we have to send the id as a request.
In the above implementation, the attack method associates the podcast with the user by creating a new record in the podcast_user table. And each of this record has an id. So, if we rename podcast_user to subscriptions, we can also create a model for working with the table directly called Subscription.
Since this table has foreign keys back to users and podcasts, we could even define those as belongsTo relationships on the new model:
Instead of using the attach method, we can just create a new subscription.
So, for unsubscribing,
Think of different states as different resources
The last custom actions we have are PodcastsController@publish and PodcastsController@unpublish.Here are the endpoints:
Again, they are not in standard CRUD, since we update published_at column, one possiblity is to use PodcastsController@update for it. But similar to Episodes, doing two different actions in one complicates the code. So, create a dedicated PublishedPodcastController.
In these situations, it can often be helpful to think of a resource in a certain state as it's own independent resource.
Just like subscribe, if publish becomes creating a published podcast, then unpublish could become destroying a published podcast.
So, here's what the PublishedPodcastsController looks like:
Conclusion
Laravel routes are a vital component of building web applications. They provide a clear and efficient way to define how your application responds to various HTTP requests. With features like route parameters, named routes, middleware, and route groups, Laravel offers a comprehensive and flexible routing system that simplifies the development process.
Credits
https://www.youtube.com/watch?v=MF0jFKvS4SI&list=LL&index=1&ab_channel=AdamWathan


Business
Introduction
Email is a fundamental tool for communication. Whether you are conducting business negotiations, marketing a product, or even receiving automated notifications, email is at the core of these interactions. However, not all email-sending methods are created equal and each method has its strengths and weaknesses, and the right choice depends on your unique needs. In this blog, we'll explore the different options mentioned below and make an informed choice based on a project's specific needs.
- Nodemailer
- SendGrid
- Resend
React Email
According to Yes Lifecycle Marketing, 2019, the average email open rate is 20.81%. So, when an email is sent from your organization, the first thing to ensure is that it doesn't land in the spam folder. For this, the services mentioned above such as Resend, and SendGrid are used.
Personalization is the key along with an appropriate preview and subject line to attract the customer's attention and stand out amongst the other mails in the inbox. Once you start personalizing your email, you will see the incredible impact it has. Emails with personalized subject lines generate 50% higher open rates.
So, a great email marketing tip would be to customize your greeting and subject line to include individual names when you send out emails. You can also try personalizing your emails with the company’s name, industry, or topic of interest.
React Email provides a set of unstyled components through which you can personalize the email being sent. This allows developers to build emails using a component-based architecture similar to React web apps. It aims to modernize the process of email development by leveraging React's syntax, TypeScript, and integrating with modern frontend tools. This provides a better developer experience compared to traditional solutions and enables developers to build beautiful, scalable email templates. React email also consists of example templates that can be tweaked as per requirements.
Components
React email provides various components that are similar to the components of HTML which makes it easier due to the familiarity with the syntax. The list of the components is provided here on the official website. You can either install a specific component or install all the components at once using the following command:
The template of your email can be designed and modified based on the content and requirements of the mail. Let us consider a simple email thanking a customer for using our service.
In the above code, we define a TypeScript interface, _91BytesThankYouEmailProps, with a userName and userMail fields. This interface specifies the structure of the props that our _91BytesThankYouEmail component is expected to receive. If no user name is provided when the email is sent, the variable userName is initialized with a default value of “Customer”.
Render
To use React Email with any email service provider, we first need to convert the components made with React into an HTML string. This is done using the render utility. To render it into HTML form, first install it using the command:
The component can be rendered using:
Service Providers
Now that we have the email template and it is rendered, we can start sending the email through a service provider. The service providers that can be integrated with React email are Resend, SendGrid, and Nodemailer. All these service providers use their own SMTP servers. Let us know more about SMTP servers in detail.
SMTP servers
Behind the scenes, SMTP servers play a crucial role in ensuring that your emails are sent and received seamlessly. SMTP stands for Simple Mail Transfer Protocol, and an SMTP server is a specialized computer program or server responsible for sending, receiving, and routing emails between different email clients and servers.
How does it work?
SMTP servers follow a series of steps to deliver your email from sender to recipient:
- Initiation: The email journey begins when you compose a message in your email client (e.g., Gmail, Outlook, or Thunderbird) and hit the "Send" button. Your email client communicates with an SMTP server, provided by your email service provider (e.g., smtp.gmail.com for Gmail) or a custom SMTP server using a private domain.
- Address Verification: The SMTP server checks the recipient's email address to ensure it's valid and properly formatted. If the address is valid, the server proceeds to the next step.
- Relay to Recipient's Server: If the recipient's email address doesn't belong to the same email service provider, the SMTP server relays the email to the recipient's SMTP server. This step involves connecting to the recipient's server using DNS (Domain Name System) to find the recipient server's IP address.
- Message Delivery: The recipient's SMTP server receives the email and stores it temporarily in the recipient's mailbox.
- User Retrieval: The recipient's email client (e.g., Outlook, Thunderbird, or a webmail service) connects to the recipient's SMTP server to retrieve the email.
- Message Read: The recipient reads the email through their email client, and the communication loop is complete.
Creating your own SMTP server can be a complex process and we can use the existing SMTP servers for our usage.
Nodemailer
Nodemailer is a popular and widely used Node.js library for sending emails. It's flexible, easy to use, and supports various email providers and protocols. With Nodemailer, you can send text emails, HTML emails, attachments, and more, making it a versatile choice for both simple and complex email-sending tasks.
Why use Nodemailer?
Before diving into how to use Nodemailer, let's understand why it's a popular choice for sending emails:
- Node.js Ecosystem: If you're already using Node.js for your backend development, Nodemailer seamlessly integrates into your stack, making it a natural choice.
- Easy to Set Up: Nodemailer is easy to set up and configure, even for beginners. It provides a straightforward way to send emails with minimal effort.
- Supports Multiple Email Services: Nodemailer supports various email providers, including Gmail, Outlook, Yahoo, and custom SMTP servers. This flexibility allows you to choose the email service that best fits your needs.
- Customization: You can customize the content, attachments, and headers of your emails, giving you full control over the email's appearance and behavior.
- Promises and Async/Await: Nodemailer supports Promises and async/await, making it easy to handle asynchronous email-sending tasks.
Now, let's get into the practical details of using Nodemailer.
Setting up
To use Nodemailer, you'll need to install it as a dependency in your Node.js project. Run the following command in the terminal:
Nodemailer requires some configuration to work correctly. Here's an example configuration for sending emails through a Gmail account:
Replace 'yourMail@gmail.com' and 'yourAppPassword' with your Gmail email address and app-specific password. Note that using your email password directly in your code isn't a secure practice for production applications. In production, you should use environment variables to store sensitive information securely.
Sending email
Once you've configured Nodemailer, sending an email is straightforward. Here's a basic example:
In this example:
- mailOptions contains the email's details, including the sender, recipient, subject, and text content.
- transporter.sendMail sends the email. It takes the mailOptions and a callback function that handles errors and provides information about the sent email.
You can customize the email's content by modifying the mailOptions object. Nodemailer also supports sending HTML content, attachments, and more advanced features.
In our example, we will also be sending an email from the node server. To do this, expose an API endpoint from your Node server that your React app can call to send emails when a form is submitted. The data sent from the React app consists of HTML and JSON data. The HTML data consists of the email template which is denoted by emailHtml and the JSON data consists of the receiver's details such as name and email ID denoted by jsonData.
Here we are using the SMTP server provided by the gmail itself. You can integrate nodemailer with resend as well. If integrated with Resend, API_KEY of resend is used along with the SMTP server of resend.
SendGrid
SendGrid is an email delivery platform that offers a suite of tools and services designed to simplify email management and enhance deliverability. Founded in 2009, SendGrid has grown into one of the leading email delivery services, trusted by businesses and developers worldwide.
Key Features of SendGrid
- Reliable Email Delivery: SendGrid ensures that your emails reach recipients' inboxes consistently, minimizing the chances of your messages being marked as spam.
- Email API: SendGrid provides a user-friendly API that allows developers to integrate email sending and tracking functionality into their applications, websites, or services. This API is available in various programming languages.
- SMTP Service: SendGrid offers an SMTP (Simple Mail Transfer Protocol) service that allows developers to send emails using their favorite email clients or libraries while benefiting from SendGrid's deliverability features.
- Email Templates: You can create and manage email templates, making it easier to maintain a consistent brand identity in your email communications.
- Email Personalization: SendGrid enables you to personalize emails by including dynamic content and recipient-specific information, enhancing engagement with your audience.
- Analytics and Tracking: Gain insights into the performance of your email campaigns with detailed analytics, including open rates, click-through rates, and bounce rates.
Setting up
In your Node.js project directory, open a terminal and run the following command to install the SendGrid package:
To use SendGrid, you need to create an account first. Head over to the website to create one. Then click on Create Identity. This is how the receivers will see the mail. Then fill in the details in the form.
Click on create after filling out the form. Then verify the sender. You will receive an email to the email address mentioned in the from section in the form. You can verify by clicking on the verify Single Sender button. Once verification is done, head over to the API keys in the settings section and create the API key. Choose the permissions based on your requirements.
Copy the API key once you create it. Now you can send emails using this API key.
Sending Email
Add your API key to the env file. Let's send the Thank you mail using SendGrid.
Resend
As we discussed before, one of the problems with sending marketing or business mail is the risk of the mail landing in the spam folder. Resend is an email service that prevents this from happening. It is quick and easy to set up. Similar to SendGrid, an API key is needed to send the mail. It can be integrated with Nodemailer too.
Let us continue with the Thank You email with Nodejs and Express being the server. We will be using the same email template that we created before.
Setting up
You can install resend with the following command:
To get the Resend API key, create a Resend account, click on Add and API key and copy the key as soon as you create it as it is only available once. You can check the emails sent and received in the Emails section.
If you observe the email template, the from email address is mentioned as 'onboarding@resend.dev' can be used to send the testing mail but not during production. So, add your domain and verify the DNS to start sending emails.
Resend requires some configuration to work correctly. Here's an example configuration for sending emails:
Sending Email
Once you've configured Resend, sending an email is simple. Here's how we will be sending the Thank You mail.
Always place your API keys in the env file. One of the key benefits of using an env file is the separation of configuration from the code. This means that sensitive information like API keys, database credentials, and other configuration settings are kept separate from the source code. This makes it easier to manage configuration settings and maintain security.
Comparison
- Nodemailer:
- Ease of Use: Nodemailer is easy to set up and configure, especially if you are already using Node.js.
- Customization: It offers great flexibility in customizing email content, attachments, and headers.
- Integration: It can be integrated with various email providers and protocols.
- Async/Await Support: Nodemailer supports async/await, making it easy to handle asynchronous email-sending tasks.
- Community: It has a large and active community, which means good support and a wide range of plugins.
- SendGrid:
- Reliability: SendGrid is known for its reliable email delivery, reducing the chances of emails landing in spam folders.
- Email API: It offers a user-friendly API for integrating email sending and tracking into applications.
- Email Templates: You can create and manage email templates for consistent branding.
- Email Personalization: SendGrid allows for dynamic content and recipient-specific information, improving engagement.
- Analytics: It provides detailed analytics for tracking email campaign performance.
- Resend:
- Anti-Spam: Resend focuses on preventing emails from landing in spam folders, a critical concern for email marketing.
- Easy Setup: It's quick and easy to set up, making it accessible for developers.
- Integration: Resend can be integrated with Nodemailer for added control over email content.
- DNS Verification: Requires DNS verification for your sending domain to improve email deliverability.
- Email History: It provides a history of sent and received emails for tracking.
Decision
The choice between Nodemailer, SendGrid, and Resend depends on your specific needs and priorities:
- Nodemailer: Choose Nodemailer if you prefer a highly customizable solution, already use Node.js, and want full control over your email-sending process.
- SendGrid: Opt for SendGrid if email deliverability and reliability are top priorities, and you need a user-friendly API for email integration. It's also suitable for businesses with a focus on branding and email personalization.
- Resend: Consider Resend if your primary concern is preventing emails from going to spam folders. It offers an easy setup and integration with Nodemailer for added control over email content.
Ultimately, the best choice depends on your project's specific requirements, development stack, and email marketing goals. You may also consider factors such as pricing, scalability, and the level of support provided by each service when making your decision.
Resources
Cover image by Stephen Phillips - Hostreviews.co.ukUnsplash
Increase icons created by IconLauk - Flaticon
https://blog.logrocket.com/streamline-email-creation-react-email/

Business
Introduction
Any application you use these days often interacts with a database. A database is at the core of a large-scale application. To store large amounts of data and retrieve them efficiently, speed matters, especially in these times when things have to be done quickly.
Laravel makes interacting with databases extremely simple across a variety of supported databases using raw SQL, a fluent query builder, and the Eloquent ORM. Currently, Laravel provides first-party support for five databases:
- MariaDB 10.10+ (Version Policy)
- MySQL 5.7+ (Version Policy)
- PostgreSQL 11.0+ (Version Policy)
- SQLite 3.8.8+
- SQL Server 2017+ (Version Policy)
Raw SQL, Query Builders and ORMs are the three common approaches for accessing data from a database. This blog will cover the three approaches along with the advantages and disadvantages of each approach. Here is a tabular view of the strengths and weaknesses of each approach.
Why three approaches?
The more advanced a query, the better it is to use fewer abstractions, with SQL having no abstraction, Query Builder having some level of abstraction and ORMs having the highest level of abstraction.
Raw SQL
As the name suggests, we directly interact with the database using SQL queries. Let's take a look at the advantages and disadvantages:
Advantages
- Control: When you write raw SQL queries, you have full control over the queries that are executed against the database. You can craft queries that are precisely tailored to your requirements, which can lead to more predictable and efficient database operations.
- Performance: Writing SQL queries directly allows you to optimize them for performance. Abstraction layers might generate suboptimal SQL in some cases, whereas with raw SQL, you can fine-tune performance-critical queries.
- Flexibility: When you write SQL directly, you can leverage the full capabilities of your database system without being limited by the abstractions imposed by higher-level tools.
- Debugging: Debugging SQL queries can be more straightforward when you write them directly.
- Complex Queries: Some database operations may require complex and custom SQL queries that are challenging to express using high-level abstractions. By writing raw SQL, you can handle even the most intricate database operations.
Let's check out some queries using raw SQL.
Queries
Select query
Select statements are used to select/retrieve data from the database. Let's take an example where we have the following tables - orders,order_details,products,and customers and perform some queries on them.
Let's consider an example:
We need to get a list of products along with their total sales, the total sales being in descending order. We have tables containing the data of orders with the name order_details and tables containing products with the name products.
Let's break it into smaller parts. Then this would be the list of tasks we need to perform in order:
- Calculate the total sales from the order_details table. We will be using GROUP BY clause for this.
- Once we know the data about the Sales, find the details of the product from the products table.
- We use join to join the products table with the Sales on the product_id column to associate each product with its total sales.
- The result set includes two columns: product_name from the products table and total_sales from the Sales.
- Then we can use ORDER BY clause orders the result set by total_sales in descending order, so products with the highest total sales will appear first in the result.
Let's see another query:
We need to retrieve a list of orders along with the names of the customers who placed them and the names of the products that were ordered. The orders should have an order date after January 1, 2022.
Again let's break it into smaller parts. Then this would be the list of tasks we need to perform in order:
- Let's focus on the first part of the query which is to retrieve a list of orders along with the names of the customers who placed them and the names of the products that were ordered. So, we join the tables to get the data.
- So, join orders table with customers,order_details,products.
- orders JOIN customers ON orders.customer_id = customers.customer_id : This is the first JOIN clause we will use. It combines data from the orders table and the customers table using the customer_id column.
- JOIN order_details ON orders.order_id = order_details.order_id : This is the second JOIN clause. It joins the order_details table with the result set obtained from the previous JOIN.
- JOIN products ON order_details.product_id = products.product_id: This is the third JOIN clause. It further extends the JOIN by bringing in product information from the products table.
- Now, let's select the required information from the result we get by joining the tables.
Now add the where condition to get the orders that have an order date after January 1, 2022.
Inserting Queries
These queries are used to insert the data into the table. The insert queries can be combined with the select queries to select data from another table and insert it into the table required.
Let's consider a situation where you have a users table, but you want to create another table for premium users in the users table called premium_users and insert the premium users' records into that table.
Let's look at another example:
We need to insert data into the clients table based on data from the suppliers table and ensure that only new clients (those that don't already exist in the clients table) are inserted.
We need to select the data from the suppliers table and then apply an additional condition that prevents from selecting the clients that already exist, for this we will use WHERE NOT EXISTS clause.
Disadvantages
- Portability: Raw SQL queries may be tied to a specific database system, making it harder to switch to a different database engine.
- Readability: As queries become more complex, managing them in code can become challenging, and it may require careful documentation to ensure that future developers can understand and maintain the queries.
- Security: Writing raw SQL queries without proper input validation and parameterization can expose your application to SQL injection vulnerabilities. You must take care to sanitize and validate user inputs.
Query Builder
In case you are wondering what a query builder is, it is an interface that allows developers to construct database queries more abstractly instead of using raw SQL statements. This makes it more readable and easy to interact with the database. Let's take a look at the documentation:
Laravel's database query builder provides a convenient, fluent interface for creating and running database queries. It can be used to perform most database operations in your application and works perfectly with all of Laravel's supported database systems.
It means that Laravel provides a fluent way to construct and execute database queries. It allows you to chain methods, and execute complex methods with ease and makes your code more readable and maintainable. One of the advantages of using Laravel's query builder is protection against SQL injections. For this Laravel uses the PDO parameter and it doesn't support binding column names, which means that you should never take column names as input from the user.
Advantages
- Fluent Query Building: Query builders are libraries or components that provide a fluent, code-based interface for constructing and executing SQL queries. They are typically used to build dynamic queries without writing raw SQL.
- Fine-Grained Control: Query builders offer fine-grained control over SQL queries, allowing you to specify select statements, conditions, joins, and other SQL components programmatically.
- Efficiency: Query builders can be more efficient in certain situations, especially when dealing with complex queries or when performance optimization is critical. They allow you to optimize SQL queries manually.
- Raw SQL Integration: Query builders often provide ways to incorporate raw SQL when necessary, providing flexibility.
- Lightweight: Query builders can be lightweight and offer a simpler way to interact with databases for developers who are comfortable with SQL.
Queries
Select Query
Let's consider an example:
The tables we have are orders,customers and products whose schema is given below.
Let's consider the following query:
We need to retrieve information about the total sales for each customer.
Let's break it into smaller parts.
- Getting the information about the sales grouped by customer's name
- We need to connect orders table with customers table first using the join method with customer_id as the common column. This gives the information about customers who have orders.
- Now we can use the join method for the result of the above with the order_items with order_id as the common column. The resultant gives information about the items ordered by the customer along with the sales of each item.
- Now that we need to use groupBy method to get information about items purchased by each customer by name.
- Finding the total sales
- From the result of the first part, we select the customer name and the sum of the total items' cost.
- To get the sum of the total items' cost, we can use the DB::raw method in Laravel query builder. It is used to execute raw SQL queries.(Remember, Laravel can not guarantee that any query using raw expressions is protected against SQL injection vulnerabilities.)
Insert Statements
Laravel's Query Builder provides an insert method that can be used to insert records into the table. The insertOrIgnore method will ignore errors while inserting records into the database. The insertUsing method will insert new records into the table while using a subquery to determine the data that should be inserted.
Let's take an example
Let's insert data from users table into another table called pruned_users given that the users updated_at column is less than or equal to one month ago.
We need to insert the values of id,name,email into the pruned_users from the users table. We will be using the insert_using method since we need to apply a condition to determine which data should be inserted into pruned_users table. This will be the subquery.
In the subquery, we need to select id,name,email from the users table with the condition that updated_at is less than a month, for which we will use where method.
Disadvantages
- Complex Queries: Query Builder can handle most SQL queries, but complex and nested queries might become harder to read and maintain compared to writing raw SQL for such scenarios.
- Performance Overhead: In some cases, Query Builder can introduce a slight performance overhead compared to writing raw SQL, especially for very complex queries, because it generates SQL dynamically.
- Less Control: Query Builder abstracts some low-level details, which can be an advantage for most tasks. However, in some situations, you may need fine-grained control over the SQL query, which is easier to achieve with raw SQL.
- Maintenance: As applications grow and evolve, maintaining and debugging complex queries built with Query Builder can become challenging, especially if they involve numerous joins and subqueries.
- Not Suitable for All Database Tasks: While Query Builder is excellent for typical CRUD (Create, Read, Update, Delete) operations, some advanced database tasks, such as database migrations or defining complex constraints, might require manual SQL.
ORM
Laravel includes Eloquent, an object-relational mapper (ORM) that makes it enjoyable to interact with your database. When using Eloquent, each database table has a corresponding "Model" that is used to interact with that table. In addition to retrieving records from the database table, Eloquent models allow you to insert, update, and delete records from the table as well.
Advantages
- Abstraction of Database Operations: ORM is a technique that abstracts the database by representing database tables as classes (models) and individual rows as objects. This allows you to interact with the database using object-oriented principles.
- Simplifies Database Interaction: ORM simplifies database interactions by providing a higher level of abstraction. You can perform CRUD (Create, Read, Update, Delete) operations on database records using object-oriented code, which can be more intuitive and maintainable.
- Relationship Management: ORMs often provide built-in support for managing relationships between database tables, such as one-to-many and many-to-many relationships. This simplifies complex data retrieval and manipulation.
- Data Validation: Many ORMs offer features for data validation and business logic enforcement, ensuring data integrity.
- Code Reusability: ORM models can promote code reusability since you can work with data objects consistently throughout your application.
- Portability: ORM models are often database-agnostic, allowing you to switch between different database systems more easily.
Queries
Complex Relationships
Complex relationships in Eloquent ORM can involve multiple levels of hasMany and belongsTo relationships between models.
Let's consider an example involving three related models: Author, Book, and Chapter. Each author can have multiple books, and each book can have multiple chapters. We'll set up these relationships to demonstrate complex relationships in Eloquent.
Author Model
Book Model
Chapter Model
With these models, we have set up the following relationships:
- An Author can have multiple Book models, so we establish a hasMany relationship between Author and Book.
- Each Book belongs to an Author, so we establish a belongsTo relationship between Book and Author.
- A Book can have multiple Chapter models, so we establish a hasMany relationship between Book and Chapter.
- Each Chapter belongs to a Book, so we establish a belongsTo relationship between Chapter and Book.
Select Queries
Let's consider the following example:
We need to fetch the list of users along with their associated posts, including columns like name, email, title, and created_at.
Let's checkout User Model and Post Model. The User model should have hasMany relationship to show that a user has multiple posts.
The Post Model should have a belongsTo relationship to associate each post with a user.
Now, we need to select the user and post details after joining them on id column.
Insert Queries
If we want to create a new user, then the create method automatically creates a new record in the users table with the specified data and returns the created user model instance, which is then assigned to the variable $user.
Disadvantages
- Performance Overhead: ORMs can introduce a performance overhead compared to writing raw SQL queries, especially for complex queries and high-traffic applications. ORM-generated queries may not be as optimized as hand-written SQL.
- Complex Queries: Complex database queries may be challenging to express using an ORM's query builder, leading to less efficient or less readable code compared to raw SQL.
- Limited Database Control: ORMs abstract the database layer, which means you have less direct control over database-specific features and optimizations. In some cases, you may need to write raw SQL for database-specific functionality.
- Overhead in Memory Usage: ORM models often load entire database rows into memory as objects. This can lead to higher memory consumption, especially for large datasets.
- Complex Migrations: Managing database schema changes and migrations can be more complex with an ORM, as it often involves creating migration files to update the schema based on changes to models.
References